 Save
Save My cousin called me in a panic three days before her graduation, asking if I could bake her a cake that would make everyone stop mid-conversation and just stare. She wanted two tiers, balloons, and something that tasted as good as it looked. I'd made plenty of cakes before, but never one that felt this ceremonial, this important. Standing in my kitchen at midnight, mixing butter and sugar, I realized this wasn't just about following steps—it was about capturing a moment worth celebrating.
The night before the graduation party, I stacked those two tiers in my friend's kitchen while her mom hovered nearby with her phone ready to photograph. When I placed the 6-inch cake on top and stepped back, we all went quiet for a moment. Then her daughter walked in, saw it, and her whole face changed. That's when I understood why people spend hours on cakes—it's not about the ingredients, it's about that exact second when someone sees something beautiful made just for them.
Ingredients
- All-purpose flour (4 1/2 cups): The foundation of your sponge, and room-temperature ingredients mean better mixing and a more tender crumb.
- Baking powder (3 1/2 tsp): This is your lift—use fresh baking powder or your cake will come out dense, and trust me, you'll notice.
- Granulated sugar (2 1/2 cups): Beaten long enough with butter, it aerates the batter and creates that light, fluffy texture everyone expects.
- Unsalted butter (1 1/2 cups for cake, 2 cups for frosting): Room temperature is non-negotiable—cold butter won't incorporate properly and you'll end up with streaky frosting.
- Eggs (8 large): Room temperature eggs emulsify better and create a smoother, more stable batter than cold ones.
- Pure vanilla extract (2 tbsp cake, 2 tbsp frosting): The flavor backbone here, so don't skimp on quality—imitation extract tastes noticeably different.
- Whole milk (2 cups for cake, 1/2 cup for frosting): Alternating it with flour keeps the batter from getting tough, and it adds tenderness you won't get any other way.
- Powdered sugar (8 cups): Sifted before you use it, otherwise you'll have lumps that no amount of beating fixes.
- Gel food coloring (optional): If you want to match school colors, gel colors won't thin your frosting like liquid ones do.
- Balloon cake toppers: These go from simple to stunning in one step—they're worth every penny.
Tired of Takeout? 🥡
Get 10 meals you can make faster than delivery arrives. Seriously.
One email. No spam. Unsubscribe anytime.
Instructions
- Prep your pans and preheat:
- Get your oven to 350°F and grease those pans—two 8-inch and two 6-inch rounds—with parchment paper fitted snugly inside. This step takes five minutes but saves you an hour of frustration trying to remove warm cake.
- Mix your dry ingredients:
- Whisk flour, baking powder, and salt together in a medium bowl until they look evenly combined. This distributes the leavening evenly so you don't get random dense spots in your finished cake.
- Cream butter and sugar:
- Beat them together for 3 to 5 minutes until the mixture is pale, fluffy, and practically doubled in volume—this is where the magic starts, building air pockets that'll make your cake tender. Stop and scrape the bowl halfway through, because butter hiding on the sides won't get properly aerated.
- Add eggs one at a time:
- Drop in each egg and beat for about 30 seconds before adding the next one—this slow incorporation keeps the batter smooth instead of curdled. If it starts looking broken or grainy, don't panic, the flour will bring it back together.
- Alternate wet and dry:
- On low speed, add the flour mixture, then milk, then flour again, starting and ending with flour. Keep the mixer speed low or you'll overdevelop the gluten and end up with a tough, rubbery cake instead of the tender crumb you want.
- Fill your pans evenly:
- Divide the batter so each pan gets roughly the same amount, then tap each pan on the counter a few times to release trapped air bubbles. Uneven baking is almost always caused by uneven batter distribution.
- Bake with patience:
- The 8-inch cakes need 35 to 40 minutes and the 6-inch ones need 25 to 30—start checking at the lower time and stick a toothpick in the center until it comes out clean. Don't open the oven door before 30 minutes or you'll disrupt the rising.
- Cool properly:
- Let cakes sit in their pans for exactly 10 minutes, then turn them out onto wire racks to cool all the way through. This window is crucial—too soon and they'll fall apart, too long and steam gets trapped and makes them soggy.
- Make your buttercream:
- Beat butter until it's creamy and pale, about 2 minutes, then gradually add powdered sugar while mixing continuously. Add milk or cream one tablespoon at a time until you reach spreadable consistency, not too stiff and not too soft.
- Assemble the base tier:
- Place one 8-inch cake on your board, frost the top, then add the second 8-inch cake on top and repeat with the 6-inch pair. If your cake layers aren't level on top, trim them with a serrated knife or cake leveler—flat surfaces mean stable stacking.
- Apply the crumb coat:
- Spread a thin layer of frosting over both cakes, then chill for 20 minutes—this seals in crumbs so your final frosting coat stays pristine. This step separates homemade cakes from bakery-quality ones.
- Frost smoothly:
- Use the remaining frosting to give both tiers a final coat, spinning them on a turntable if you have one and using an offset spatula for clean lines. Work slowly and let the cool cake help you—rushing leads to dragged frosting and visible crumbs.
- Stack and secure:
- Center the 6-inch tier on top of the 8-inch one, using dowels or straws pushed through the bottom tier for support if your cakes are heavy. This prevents the bottom cake from squishing under the weight.
- Decorate with balloons:
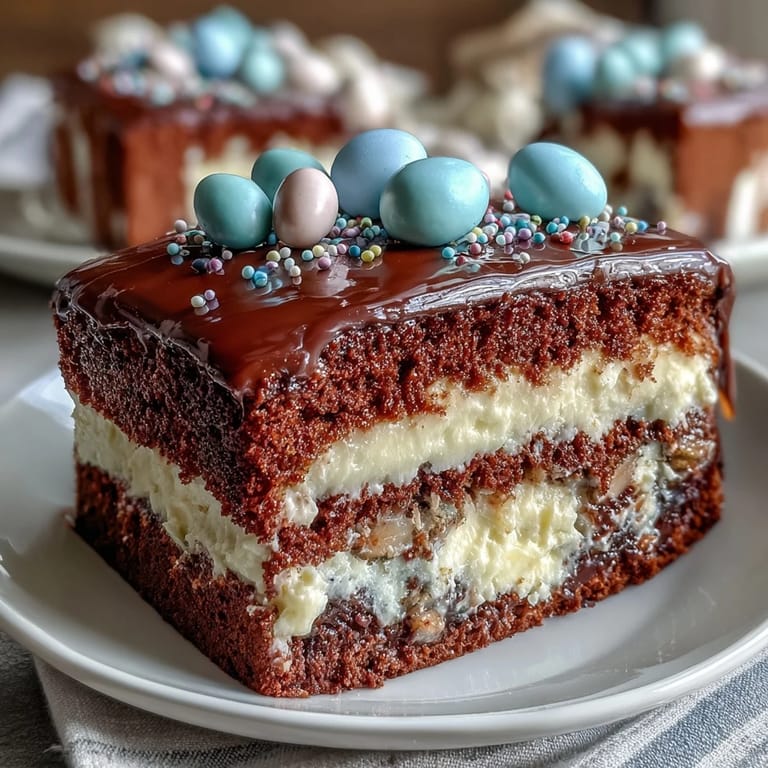
- Push your balloon toppers into the top tier, arrange edible confetti around them, and step back to admire what your hands just created.
 Save
Save I watched my cousin cut into that cake at the party and the room erupted—not just because it looked stunning, but because everyone's face lit up the moment they tasted that first bite. That's when I realized the balloons and frosting were just the introduction; the real magic was the flavor and texture that made people close their eyes and smile.
Why Vanilla Sponge Wins for Celebrations
Vanilla sounds simple until you taste one done right, when the flavor is rich and complex without being overpowering. This sponge strikes that balance because the butter and milk keep it tender and moist, while the vanilla extract adds depth that brings everything together. A good vanilla cake is like a canvas—it stands on its own but also makes the frosting, decorations, and celebration around it shine brighter.
The Two-Tier Technique That Actually Works
Two tiers intimidate people, but the secret is treating them as two separate cakes first, then stacking them like building blocks. I frost and chill each tier completely before they ever touch each other, which means if something goes wrong with the frosting on one, I haven't ruined both. The chilling time between crumb coat and final frosting is your insurance policy—it firms up the surface so you can frost smoothly without dragging crumbs into your frosting.
Making It Yours Without Overthinking
The beauty of this recipe is that it begs for personalization without requiring extra skill. Swap vanilla for almond or lemon extract if you want something different, tint the frosting in school colors, or add sprinkles that match the graduate's favorite things. The structure is forgiving enough to handle these changes because the cake itself is so solid and dependable.
- Try almond extract in the batter for a subtle depth that makes people wonder what they're tasting.
- Make a buttercream test batch the day before if you're tinting it—food coloring can shift in shade as it sits.
- Remember that dowels should sit shorter than your bottom tier height so they don't poke through the top cake.
 Save
Save This cake stopped being a recipe for me the moment I saw someone's face light up tasting it—it became a memory, and now every time I make it, I'm making that feeling again. Bake this with confidence, knowing that the science and technique are on your side, and the result will be as beautiful as it is delicious.
Recipe FAQs
- → What type of flour is best for the sponge?
All-purpose flour creates a balanced texture, providing structure while keeping the sponge tender and moist.
- → How do I achieve a smooth buttercream frosting?
Beat softened butter first until creamy. Gradually add powdered sugar and milk, mixing until smooth and spreadable for that flawless finish.
- → Can I customize the cake decorations?
Yes, adding food coloring to the buttercream or using edible sprinkles lets you tailor the look while keeping it festive and vibrant.
- → How should I stack the cake tiers safely?
Use dowels or sturdy straws inside the cake to support the upper tier, ensuring stability without affecting presentation.
- → What’s the ideal baking temperature and time?
Bake at 350°F (175°C). Larger tiers take 35–40 minutes; smaller tiers bake in 25–30 minutes, until a toothpick comes out clean.