 Save
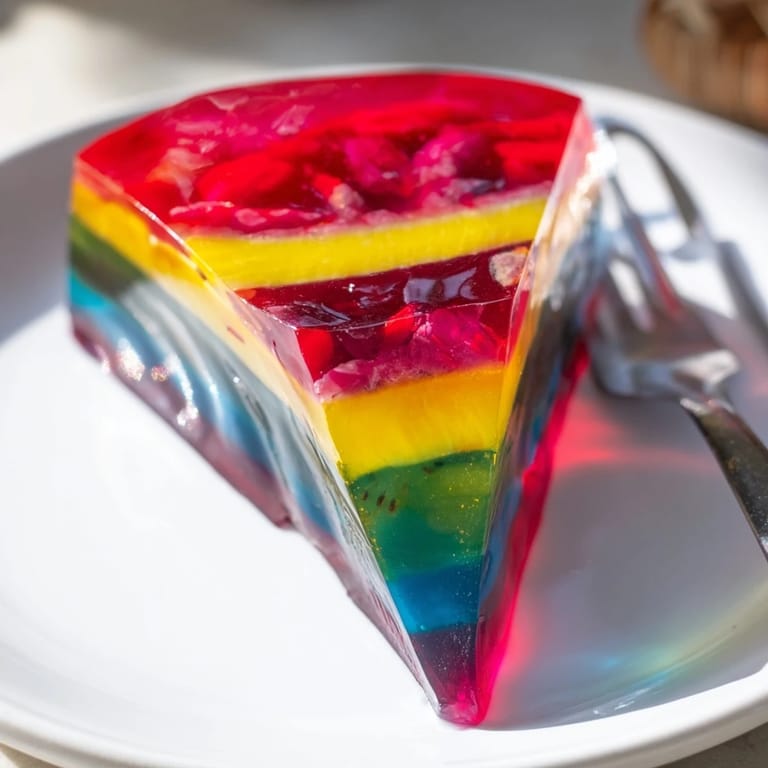
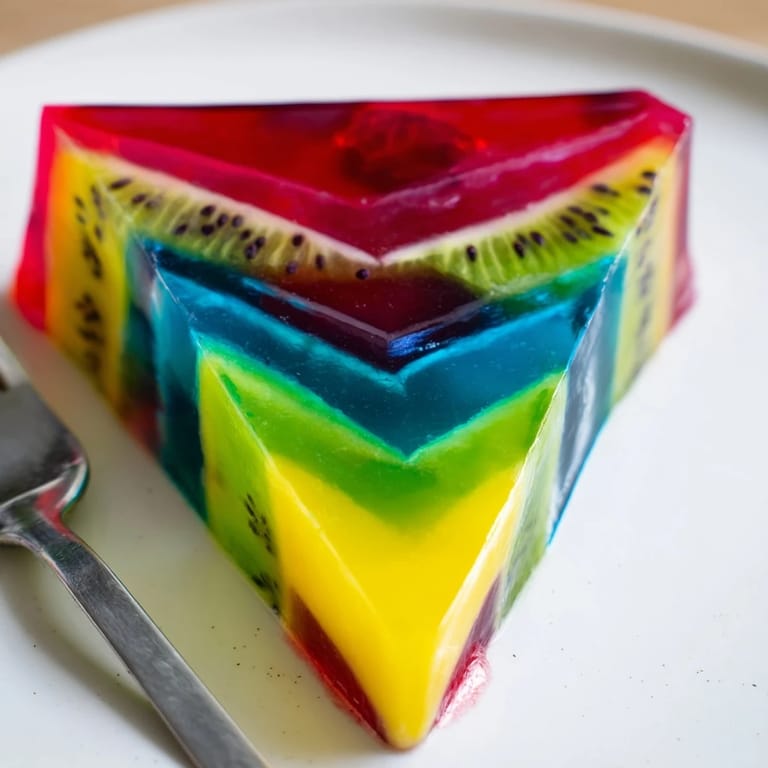
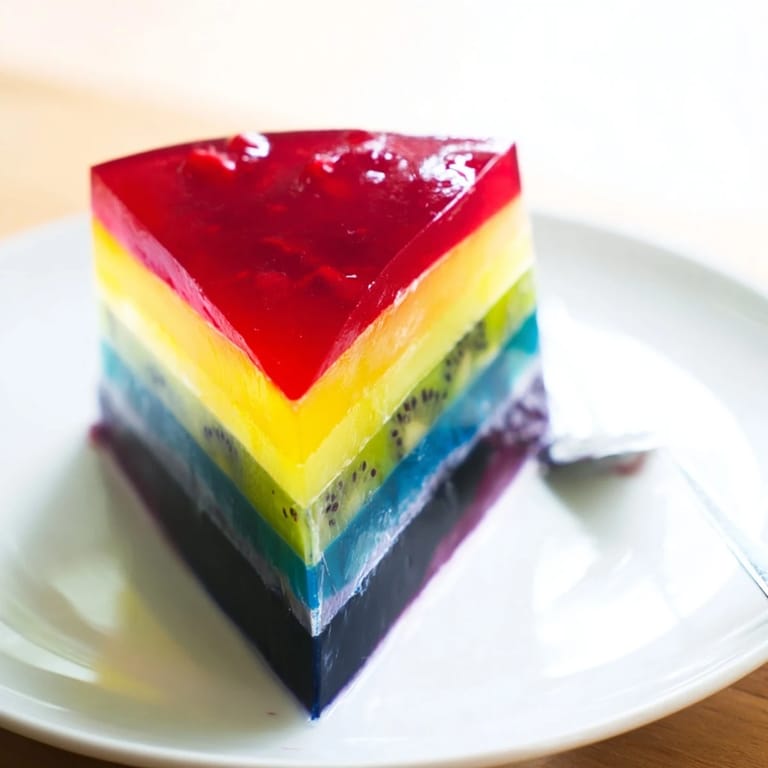
Save The first time I saw a kaleidoscope dessert, I was mesmerized by how something so intricate could come together in a kitchen that wasn't even particularly fancy. A friend had sliced into one at a dinner party, and the room went quiet for just a second—that magical pause when beauty interrupts conversation. I became obsessed with recreating that moment, learning that V-shaped segments and bold colors weren't about being precious; they were about catching someone's eye and making them smile before they even tasted it.
I made this for a birthday dinner during a particularly gray November, and I remember my sister leaning over the table with her phone, asking if she could photograph it before eating. That's when I knew the recipe had done what I hoped—it turned an ordinary dessert into something that felt like a small celebration all on its own.
Ingredients
- Whole milk: This is your base, and the choice between whole and lower-fat matters more than you'd think—whole milk creates a richer, creamier custard that holds color better.
- Heavy cream: Non-negotiable for that silky texture; it's what transforms simple gelatin into something luxurious.
- Granulated sugar: Dissolve it completely in the warm milk so there are no grainy moments when you bite through.
- Powdered gelatin: Bloom it properly—those five minutes aren't optional, they're what keeps the layers from weeping or breaking apart.
- Vanilla extract: A quiet backbone that ties all the fruit flavors together without shouting.
- Food coloring (gel or liquid): Gel colors give deeper, more jewel-like tones than liquid, but either works; use sparingly at first and adjust.
- Fruit puree: Raspberry, mango, kiwi, blueberry, and blackberry give you a natural color palette that actually matches flavors you'd want together.
- Digestive biscuits or graham crackers: The crumb base needs to be pressed firmly—this is your foundation and deserves attention.
- Unsalted butter, melted: It bonds the crumbs into something that feels substantial, not sandy.
Tired of Takeout? 🥡
Get 10 meals you can make faster than delivery arrives. Seriously.
One email. No spam. Unsubscribe anytime.
Instructions
- Build Your Base:
- Crush your biscuits into uneven crumbs—some texture is better than powder. Mix with melted butter until it feels like wet sand, then press it firmly into the springform pan, working it up the sides slightly so it holds everything in place. The springform pan is lined with parchment, which means you can lift the whole thing out once it's set.
- Wake the Gelatin:
- Sprinkle gelatin over cold water and let it sit untouched for exactly five minutes. This blooming step hydrates the gelatin so it dissolves smoothly into your warm custard instead of clumping like flour in cold milk.
- Create the Custard:
- Heat milk, cream, and sugar together, stirring occasionally until the sugar disappears and steam rises from the surface. Remove from heat—you want it hot but not bubbling—then stir in the bloomed gelatin until you can't see a single granule. Add vanilla and give it a final whisk. This mixture is now your blank canvas.
- Divide and Color:
- Pour the warm custard into five bowls, dividing it as evenly as you can. To each bowl, add a fruit puree and a drop or two of matching color. Stir each one thoroughly; the puree not only flavors but also helps the color distribute evenly without streaking.
- Shape the Segments:
- This is where patience pays off. Fold aluminum foil into dividers that create five V-shaped sections radiating from the center of your pan, like pie slices. Pour each colored mixture carefully into its own section, filling to about three-quarters full. Chill for 30 minutes until the layers are set enough to hold their shape.
- Remove Dividers Gently:
- Once the layers are firm, carefully lift away the foil dividers. Work slowly and use a thin knife to ease them out if they're stuck. The layers should hold together now, creating those satisfying V-shaped wedges.
- Final Chill and Release:
- Give the whole dessert at least two more hours in the coldest part of your fridge. When you're ready to serve, run a thin knife around the edge of the pan and release the springform. Let it sit at room temperature for five minutes before slicing—this makes cuts cleaner and colors more vivid.
 Save
Save I've served this dessert to people who normally don't talk much at dinner, and it somehow loosened everyone up. Something about a beautiful, colorful thing on the table makes people more open, more playful. That's the real recipe—visual joy translating into genuine connection.
Customizing Your Kaleidoscope
The magic of this dessert is that it's genuinely flexible. You can follow the fruit and color pairing I've suggested, or you can lean into your own preferences—maybe you want all citrus flavors with yellows and oranges, or a berry-focused version in reds and purples. The technique stays exactly the same; what changes is the story you tell with color and taste. I've made versions where each segment is a different texture, adding matcha powder to one layer or passion fruit to another, and the framework always works.
Serving and Storage
This dessert is best served chilled, ideally within 24 hours of unmolding so the layers stay distinct and don't dry out. If you need to make it ahead, keep it in the springform pan, covered loosely with plastic wrap, for up to three days. Sliced portions can be stored in an airtight container for two days, though the cut edges will gradually absorb moisture and become less striking.
Vegan and Alternative Versions
If you're cooking for someone who can't eat gelatin, agar-agar is a straight substitute—use the same weight and follow identical blooming instructions, though agar sets more firmly than gelatin, so your layers will be slightly denser. Swap dairy milk for coconut milk and the heavy cream for coconut cream, and the flavor actually deepens into something almost tropical. I made a completely vegan version last month, and honestly, the colors came out more vibrant because coconut cream doesn't dilute the food coloring the way dairy does.
- Agar-agar sets faster than gelatin, so work quickly when layering and monitor chilling times.
- Coconut-based versions work beautifully with tropical fruit purees like pineapple, passion fruit, and guava.
- Always double-check that your food coloring is vegan-certified if that matters for your guests.
 Save
Save Every time I unmold this dessert, there's that moment of wondering if it worked, and then it always does—colors vivid, layers intact, a small edible miracle. That feeling of anticipation and relief never gets old.
Recipe FAQs
- → How do I achieve the vibrant colors in the layers?
Use gel or liquid food coloring combined with matching fruit purees such as raspberry, mango, kiwi, blueberry, and blackberry to create bright, contrasting layers.
- → What is the purpose of gelatin in this dessert?
Gelatin helps set the creamy layers firmly, allowing them to hold the V-shaped form while maintaining a smooth texture.
- → Can I make this dessert vegan-friendly?
Yes, substitute gelatin with agar-agar and replace dairy milk and cream with coconut alternatives for a vegan version.
- → How do I create the V-shaped segments during preparation?
Use aluminum foil or cardboard dividers arranged in V-shaped sections inside the springform pan, pouring each colored layer into its own segment before chilling.
- → What base works best for this dessert?
A crushed digestive biscuit or graham cracker base mixed with melted unsalted butter provides a crunchy texture that complements the creamy layers.
- → How long should I chill the dessert before serving?
Chill for at least three hours total, including initial layer setting and final chilling, to ensure all layers are fully firm and flavors meld.